|
Loading...
-
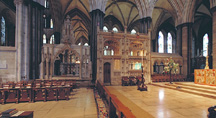
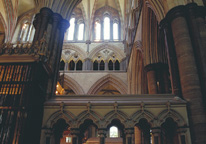
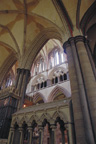
Choir and Presbytery
-
-
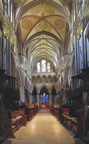 |
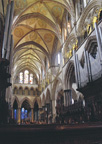
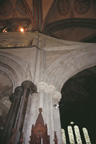
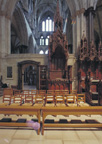
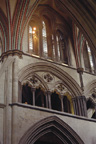
Choir and presbytery, to east
View taken towards east, from bay 11 (the westernmost
part of the choir).
|
-
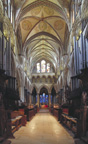 |
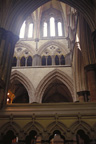
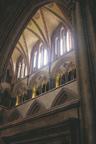
Choir and presbytery, to east
View towards east end of presbytery, taken from bay 11
(westernmost bay of the choir).
|
-
 |
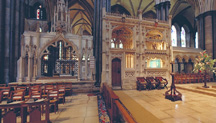
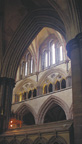
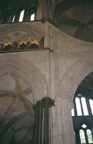
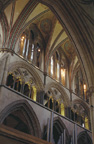
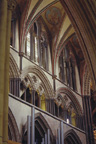
North and east walls
View taken towards northeast from the southwest corner
of choir.
|
-
 |
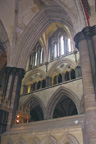
South and east walls
View of choir and presbytery taken from northwest
corner of choir.
|
-
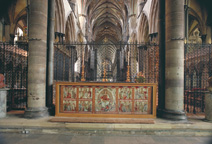 |
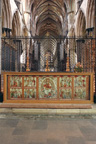
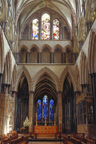
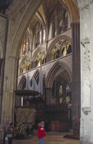
Bay 4, view towards presbytery
Taken from bay 4 towards the west, looking at the
eastern edge of the presbytery. Needlepoint altar frontal is in
foreground.
|
-
 |
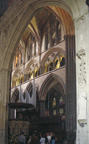
East boundary of presbytery
View taken from bay 4, in the ambulatory, looking
west into the presbytery.
|
-
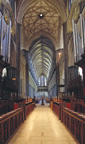 |
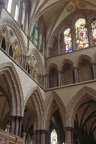
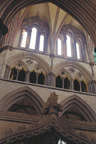
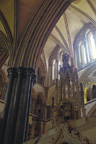
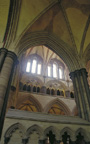
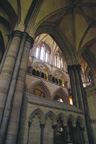
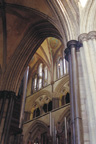
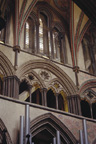
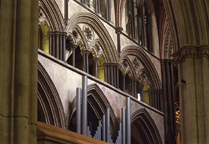
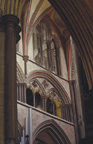
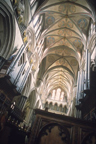
Choir view to west
View taken from presbytery, looking through the choir
into the nave. Note the elaborate vaulting of the crossing.
|
-
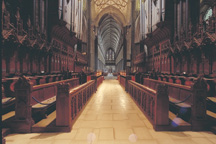 |
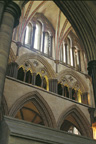
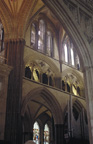
Choir, view to west
Taken from bay 8, the eastern crossing, and looking
towards the west. Choir stalls are in bays 9,10 and 11.
|
-
-
 |
East wall, bay 5
Terminal east wall of the presbytery. The Trinity
Chapel extends further to the east beyond the piers that define
the eastern edge of the presbytery.
|
-
 |
Triforium, east wall
|
-
 |
Clerestory, east wall
|
-
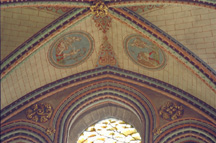 |
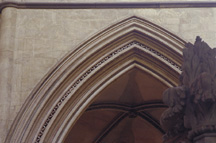
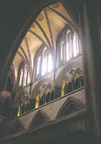
Apex, east wall
The junction of the east wall and the vault of bay
5. The eastern clerestory window is shown just below the
junction.
|
-
 |
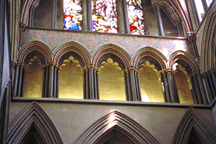
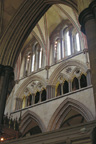
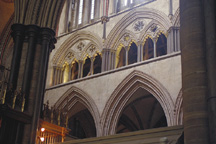
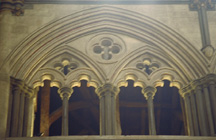
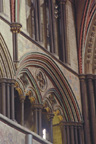
North and east walls
Arcade, gallery, and clerestory levels at the juncture
of the east and north walls of the presbytery, bay 5.
|
-
 |
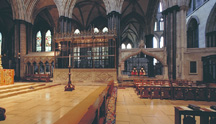
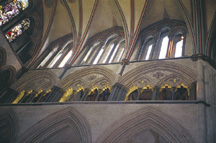
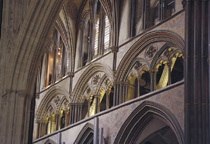
North presbytery bays, 5,6,7
Taken with perspective-correcting lens, from south wall
of presbytery. Altar is at right.
|
-
 |
North presbytery bays, 5,6,7
|
-
 |
North wall, bay 5
Clerestory, gallery, and upper portion of main
arcade of the north wall, bay 5. View taken from the south
aisle, over the top of the tomb of Bishop Hamilton.
|
-
 |
North wall, bay 5
Clerestory, gallery, and upper portion of main
arcade of the north wall, bay 5. View taken from the
south aisle, over the top of the tomb of Bishop
Hamilton.
|
-
 |
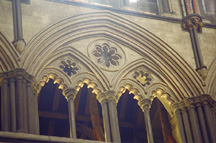
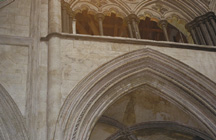
North wall, arcade and triforium
North wall of bay 5 and part of bay 6, taken
from south.
|
-
 |
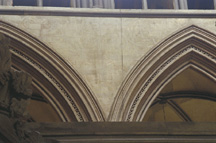
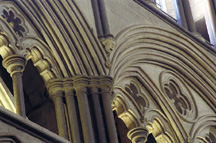
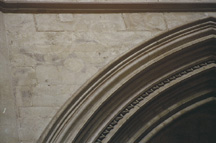
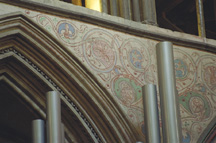
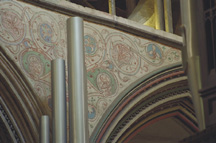
Arcade detail
Spandrel and mouldings of the arcade, north
wall, bay 5. Some polychromy is still visible on the
mouldings. Note join with eastern wall to right of
image.
|
-
 |
Arcade detail
Mouldings and spandrel of arcade, bays 5
(right) and 6 (left). Faint traces of medieval
decoration are visible in the spandrels.
|
-
 |
Triforium
Bay 4, triforium level. Timbers of sloped roof
over north aisle are visible through the triforium
openings. Juncture of east wall is at right of image.
|
-
 |
Apex, north wall
Juncture of the vault and the clerestory window
in north wall, bay 5. Polychromy is 19th-century.
|
-
 |
North wall, bays 6 and 7
Upper portion of arcade, triforium, and clerestory
are seen from the south aisle, bay 5.
|
-
 |
North wall, bays 6 and 7
Upper portion of arcade, triforium, and
clerestory are seen from the south aisle, bay 5.
|
-
 |
North wall, bays 6 and 7
Upper portion of arcade, triforium, and
clerestory are seen from the south aisle, bay 5. Taken
with natural light.
|
-
 |
North wall, bays 6 and 7
Upper portion of arcade, triforium, and
clerestory are seen from the south aisle, bay 5. Taken
with flash.
|
-
 |
North wall, bays 6 and 7
Upper portion of arcade, triforium, and
clerestory are seen from the south aisle, bay 5. Taken
with natural light.
|
-
 |
North wall, bays 6 and 7
Bay 7 at left; bay 6 at right. Taken from south
aisle, bay 7.
|
-
 |
Arcade and triforium
Bay 6 at right, bay 7 to left. View taken from
bay 5, south aisle. Through the arches of the arcade,
the vaults of the north choir aisle are visible. The
wooden structure supporting the aisle roof is visible
through the triforium arcade.
|
-
 |
Arcade spandrels
Spandrels and moulding of arcade between bays 6
and 7.
|
-
 |
Arcade spandrel
Bay 7, west spandrel.
|
-
 |
Triforium, bay 6
|
-
 |
Triforium, bay 7
|
-
 |
Winch, bay 7
Winch formerly used to raise and lower a lenten
veil.
|
-
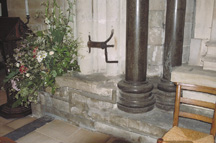 |
Winch, bay 7
Winch formerly used to raise and lower a lenten
veil.
|
-
 |
North wall, bays 7 and 8
Bay 8, or the eastern crossing, is at left of
image, and bay 7 is to the right. Seen from south aisle,
over tomb on south side of choir, bay 7.
|
-
 |
South and east walls
In center of image is juncture of the east presbytery
wall (left) and the south wall of bay 5. Bay 6 is at right of
image. View taken from north aisle, over the top of tomb of
Bishop Roger de Martival.
|
-
 |
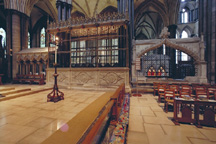
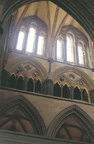
South presbytery bays, 5,6,7
Taken with perspective-correcting lens from north wall
of presbytery. Altar is at left.
|
-
 |
South presbytery bays, 5,6,7
|
-
 |
South wall, bays 5, 6, and 7
Bay 5 is at left, bay 7 at right. Seen from north
choir aisle.
|
-
 |
South wall, bays 5, 6, and 7
Upper portion of arcade, triforium, and
clerestory of bays 5 (left), 6, and 7 (right), seen from
the north aisle, bay 8.
|
-
 |
Upper levels, south wall
Triforium and clerestory of bays 5 (left)
through 7. The more elaborate pier and mouldings at the
right of the image belong to the eastern crossing.
|
-
 |
South wall, bays 5,6
Arcade, triforium, and clerestory levels of south
wall of bays 5 (left) and 6. View taken from north aisle,
over the top of tomb of Bishop Robert Bingham.
|
-
 |
South wall, bays 5 and 6
Bays 5 (left) and 6 (right) seen from bay 5,
north aisle.
|
-
 |
South wall, bays 5 and 6
Bays 5 (left) and 6 (right) seen from bay 5,
north aisle.
|
-
 |
South wall, bays 6 and 7
Bays 6 (left) and 7 (right) seen from bay 5, north
aisle.
|
-
 |
South wall, bays 6 and 7
Bays 6 (left) and 7 (right) seen from bay 5,
north aisle.
|
-
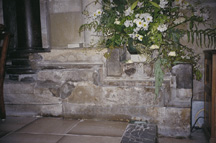 |
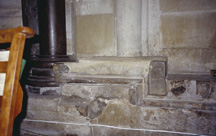
Plinth detail, bay 7
Remains of raised floor in the presbytery,
junction of bays 7 and 8, south side.
|
-
 |
Plinth detail, bays 7 and 8
Remains of raised floor in presbytery, junction
of bays 7 and 8, south side.
|
-
 |
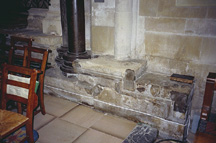
Detail, plinth, bay 7
Closeup view of remains of raised presbytery
floor, junction of bays 7 and 8, south side of
presbytery.
|
-
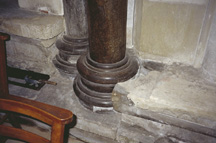 |
Detail, plinth, bay 7
Closeup view of remains of raised presbytery
floor and Purbeck bases, junction of bays 7 and 8, south
side of presbytery.
|
-
 |
Junction, bays 6 and 7
The Hungerford tomb (bay 6) is at left, and the
tomb of Simon de Gandavo (bay 7) is at right. South side
of presbytery.
|
-
 |
Juncture, bays 6 and 7
The Hungerford tomb (bay 6) is at left, and the
tomb of Simon de Gandavo (bay 7) is at right. South side
of presbytery.
|
-
 |
Plinth detail, bays 6 and 7
Juncture of plinth and tombs between bays 6 and
7, south side of presbytery.
|
-
 |
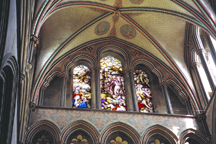
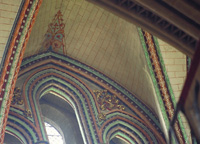
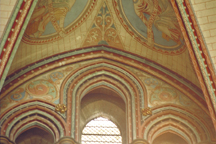
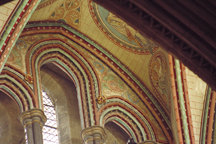
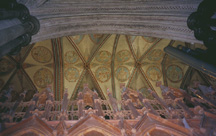
Presbytery vaults
Bays 5, 6, and 7 of the presbytery. The eastern
clerestory window is at the bottom of the image. Polychromy is
from the 19th century, based on drawings of the medieval
remnants.
|
-
-
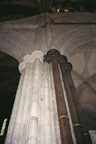 |
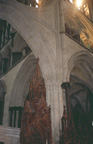
Northeast pier, bay 8
The north arm of the eastern transept extends at the
left of the image. The purbeck colonettes face into bay 7 of the
presbytery.
|
-
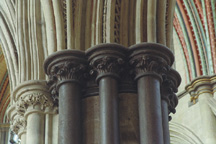 |
Capitals, northeast pier
Purbeck capitals on the northeast pier, facing bay
7 of the presbytery.
|
-
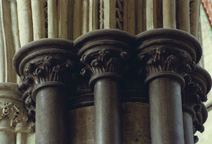 |
Detail, capitals of pier
Closeup view of the purbeck capitals on the
northeast pier, bay 8, facing the presbytery.
|
-
 |
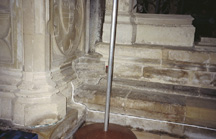
Base, northeast pier
Winch formerly used for raising and lowering Lenten
veil is visible, as well as the juncture of Purbeck bases
and base of crossing pier.
|
-
 |
Northwest pier, bay 8
Bay 8 and eastern transept are on the right side of
image; purbeck colonnettes at left face the choir bays which
extend to the west.
|
-
 |
Southeast pier, bay 8
Southern arm of the eastern transept is at right of
image. Purbeck capitals at left face into the presbytery, bay 7.
|
-
 |
Southwest pier, bay 8
The southern arm of the eastern transept extends to the
left. The purbeck colonettes at right face towards the choir.
Tops of the choir stalls are visible at bottom right.
|
-
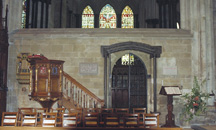 |
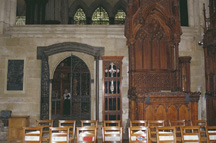
North entrance to choir, bay 8
Entrance into the choir from the north side of the
eastern crossing. This view is taken from inside the choir
looking to the north; the north transept windows are visible
behind entrance. Pulpit is to the left of the doorway.
|
-
 |
South entrance to choir, bay 8
Entrance to choir located on the south side of the
eastern crossing. This view taken from inside the choir, looking
to south. South arm of the eastern transept is visible beyond
the choir entrance. The Bishop's throne is located to the right
of the doorway.
|
-
 |
South entrance to choir, bay 8
Entrance to choir located on the south side of the
eastern crossing. This view taken from inside the choir,
looking to south. Bishop's throne is to the right of the
doorway.
|
-
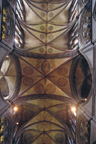 |
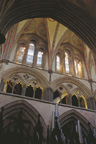
Eastern crossing vault
Vaults over both choir and presbytery, with the eastern
crossing vault (bay 8) in the center.
|
-
-
-
 |
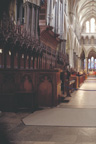
Choir stalls, bays 9,10,11
Choir stalls located along north wall of choir. Bay
9 is in the foreground, and the view extends through the
crossing and into the nave.
|
-
 |
Choir stalls, bays 9,10,11
View of north choir stalls, with bay 11 in the
foreground. The view extends through the eastern crossing,
through the presbytery, and into the Trinity Chapel.
|
-
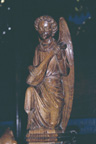 |
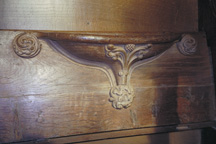
Detail, carved figure
Figure of musician, located in back row of
choir stalls, bay 11.
|
-
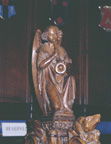 |
Detail, carved figure
Figure of musician, located in back row of
stalls.
|
-
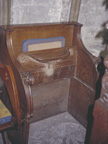 |
Detail, choir seat
Choir seat, with base folded up.
|
-
 |
Detail, misericord
Carved misericord under choir seat.
|
-
 |
North wall, bays 9,10,11
Upper portion of arcade, triforium, and clerestory
of north wall of choir bays. Taken from bay 9, from the
south aisle. Bay 11 is at far left.
|
-
 |
North wall, bays 9,10,11
Bay 11 is at left (west); bay 9 at right, next to
eastern crossing (elaborate pier at right). View taken from
south arm of eastern transept.
|
-
 |
North wall, bay 9
Bay 9, north wall, taken from south aisle, bay 9.
Eastern crossing is to the right (bay 8).
|
-
 |
North wall, bays 10,11
Upper levels of bay 11 (left) and bay 10 (right),
as seen from south aisle, bay 9.
|
-
 |
North wall, bays 10,11
Upper levels of bay 11 (left) and bay 10 (right),
as seen from south aisle, bay 9.
|
-
 |
North wall, bays 10,11
Bays 11 (left, next to main crossing) and 10
(right), seen from south arm of the main transept (bay 12).
|
-
 |
Triforium, bays 9, 10
Detail of singing vicar head between triforium bays
9 and 10.
|
-
-
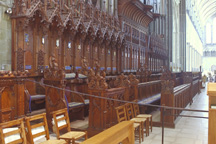 |
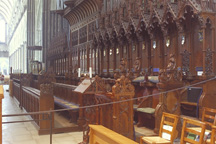
South choir stalls
Choir stalls extending along bays 9, 10, and 11 of
the south choir wall. Bay 9 is in the foreground, and the
view extends west through the crossing and into the nave.
|
-
 |
South choir stalls
View of choir stalls extending along bays 9,10 and
11 of the south wall of choir, with bay 11 in foreground.
The view extends to the east through the presbytery and into
the Trinity Chapel.
|
-
 |
South wall, bays 9,10,11
South wall of choir bays 9 (left), 10 and 11, as
seen over the north entrance to the choir, bay 8.
|
-
 |
South wall, bays 9,10,11
|
-
 |
South wall, bays 9,10,11
|
-
 |
South wall, bays 9,10,11
Bay 9 is at left, and bay 11 at right. View is from
the north arm of the main transept, through the main
crossing arch. Pier to main crossing is visible to right of
bay 11.
|
-
 |
South wall, bays 9,10,11
Bay 9 is at left, and bay 11 at right. View is from
the north arm of the main transept, through the main
crossing arch. Pier to main crossing is visible to right of
bay 11.
|
-
 |
Upper levels, south wall
Triforium and clerestory of bays 9 (left), 10, and
11 (right), shown from north arm of main transept, through
crossing arch.
|
-
 |
South wall, bay 9
Triforium and clerestory levels of bay 9, south
wall, seen from north aisle. Eastern crossing is to left of
image.
|
-
 |
Arcade spandrel
Spandrels of arcade in bay 9, south wall.
Eastern crossing is to left. Vaulting of south choir
aisle is visible through arcade, and roof structure over
the aisle is visible through the triforium.
|
-
 |
Arcade spandrel
Left spandrel of south arcade, bay 9. Vestiges
of medieval decoration are visible on the masonry.
|
-
 |
Apex, bay 9
Junction of clerestory and vault at bay 9,
south wall.
|
-
 |
South wall, bay 10
Bay 10 of choir, seen from north aisle, bay 9.
|
-
 |
Apex, bay 10
Junction of clerestory and vault, bay 10, south
wall.
|
-
 |
South wall, bays 9, 10
Taken from north aisle, bay 9, looking towards
south wall. Eastern crossing, bay 8, is extends to the left
of picture.
|
-
 |
South wall, bays 10, 11
View from north aisle, bay 9, looing southwest
towards bays 10 and 11. The main crossing (bay 12) extends
to right of picture.
|
-
 |
Triforium, bays 10,11
|
-
 |
South wall, bay 11
Bay 11, shown from north aisle, bay 9. Note
19th-century polychromy in imitation of the medieval
decoration.
|
-
 |
Triforium, bay 11
Triforium, bay 11, showing polychromy. Main
crossing arch is at right.
|
-
 |
Arcade spandrel
Spandrel between bays 10 and 11, facing into
choir.
|
-
 |
Arcade spandrel
Spandrel between bays 10 and 11, facing into
choir.
|
-
 |
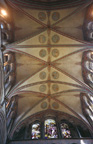
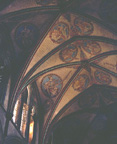
Choir vaults
View from main crossing looking east into choir, east
crossing, and presbytery.
|
-
 |
Choir vaults
View taken from north choir aisle, bay 9. Eastern
crossing vault (bay 8) is at left, and bay 11 is at far
right.
|
-
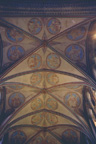 |
Choir vaults
Choir vaults, with bay 11 at top of image and bay 9
at bottom.
|
-
 |
Choir vaults
Bay 10 is in center of image. Wall at left is the
south wall of the choir.
|
|